# Vaultwarden

Vaultwarden is an open source password manager and an alternative implementation of the Bitwarden server API written in Rust and compatible with upstream Bitwarden clients\*. It is perfect for self-hosted deployment where running the official resource-heavy service might not be ideal.  
  
More info about the project can be found here, https://github.com/dani-garcia/vaultwarden.  
  
 Note: at Cloud68.co we do NOT develop this software and all the names and trademarks of the software are owned by the entity behind the project.

# Software update frequency

For information about the way we handle software updates, please visit [https://docs.cloud68.co/books/faqs-tech-support/page/scheduled-maintenance-software-updates](https://docs.cloud68.co/books/faqs-tech-support/page/scheduled-maintenance-software-updates).

# How to invite a new user to Vaultwarden

To invite a new user to your Vaultwarden organization, you will need to follow the steps below:  
1\. Login to your Vaultwarden instance (if you are not logged in already)  
2\. Navigate to your organization  
3\. Click Manage and then click invite user  
4\. Enter the user email address, type of user and the level of access.  
5\. Click save  
This will send an email invitation which is valid for 5 days.

The new user you added needs to follow the steps below in order to create their account.  
1\. Login to your email account.  
2\. Open the email from Vaultwarden inviting you to join the organization.  
3\. Click the link on the email and click create new account   
4\. Enter your details (please be careful to remember the master password because this password can not be reset)  
5\. Click continue  
6\. Now you will get an email into your mailbox to verify. Click the link on the email.  
7\. Now login with your email and your master password.

After the new user has created their account, the organization owner needs to confirm the newly added user. To do this, you can follow the steps below:  
1\. Login into your account  
2\. Navigate to your organization  
3\. Click manage  
4\. Select the newly added use and click confirm

# Setting up Vaultwarden on your mobile device

<div class="markdown-body container-fluid" id="bkmrk-download-the-bitward"><div class="markdown-body container-fluid">1. Download the Bitwarden app from App Store or Play store  
    [ ![google-play-store-seeklogo.com.jpg](https://docs.cloud68.co/uploads/images/gallery/2023-01/scaled-1680-/rbtIcqNU2RpmFmBw-google-play-store-seeklogo-com.jpg) ](https://play.google.com/store/apps/details?id=com.x8bit.bitwarden)[![download-on-the-app-store-flat-badge-seeklogo.com.jpg](https://docs.cloud68.co/uploads/images/gallery/2023-01/scaled-1680-/DGCNL1fvt2xKRJTC-download-on-the-app-store-flat-badge-seeklogo-com.jpg)](https://itunes.apple.com/app/bitwarden-free-password-manager/id1137397744?mt=8)

</div></div>The steps below are the same for both platforms

<div class="markdown-body container-fluid" id="bkmrk-on-the-login-screen%2C">2. On the login screen, click the gear icon
3. Type the URL of your instance.
4. Click save
5. Type your email and your master password
6. Click login

</div>

# Setting up Vaultwarden on your desktop

1\. Download the desktop app for your platform:  
 [![windows-10-icon-seeklogo.com.jpg](https://docs.cloud68.co/uploads/images/gallery/2023-01/scaled-1680-/zXRuzIdkH1Jd6eo6-windows-10-icon-seeklogo-com.jpg) ](https://vault.bitwarden.com/download/?app=desktop&platform=windows)[![macos-seeklogo.com.jpg](https://docs.cloud68.co/uploads/images/gallery/2023-01/scaled-1680-/DOcR2w3zNfTmQNYK-macos-seeklogo-com.jpg) ](https://itunes.apple.com/app/bitwarden/id1352778147)[![Linux_Tux.jpg](https://docs.cloud68.co/uploads/images/gallery/2023-01/scaled-1680-/fo2TfORph0v5MoJW-linux-tux.jpg)](https://vault.bitwarden.com/download/?app=desktop&platform=linux)  
  
 The steps below are the similar for all desktop platforms  
  
2\. Double-click on the downloaded app and follow the instructions to install it  
3\. Open Bitwarden app and on the bottom click Accessing: and select self-hosted

[![image.png](https://docs.cloud68.co/uploads/images/gallery/2026-01/scaled-1680-/SEVR2vCgppZUj7Wm-image.png)
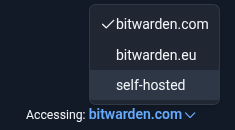
](https://docs.cloud68.co/uploads/images/gallery/2026-01/SEVR2vCgppZUj7Wm-image.png)

4\. Input your organization Vaultwarden instance URL (e.x passwords.example.org)

[![image.png](https://docs.cloud68.co/uploads/images/gallery/2026-01/scaled-1680-/KrRjgYBX8sDpfSBe-image.png)
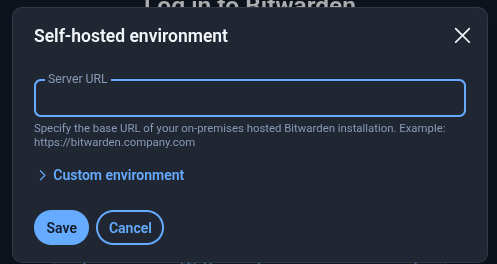
](https://docs.cloud68.co/uploads/images/gallery/2026-01/KrRjgYBX8sDpfSBe-image.png)

  
5\. Click Save  
6\. Enter your account details and click continue

# Setting up Vaultwarden browser plugin(s)

1\. Click on of the links below to get the extension which is compatible with your browser  
 Chrome: [https://chrome.google.com/webstore/detail/bitwarden-free-password-m/nngceckbapebfimnlniiiahkandclblb](https://chrome.google.com/webstore/detail/bitwarden-free-password-m/nngceckbapebfimnlniiiahkandclblb)  
 Firefox: [https://addons.mozilla.org/firefox/addon/bitwarden-password-manager/](https://addons.mozilla.org/firefox/addon/bitwarden-password-manager/)  
 Safari: [https://itunes.apple.com/app/bitwarden/id1352778147](https://itunes.apple.com/app/bitwarden/id1352778147)  
 Brave: https://chrome.google.com/webstore/detail/bitwarden-free-password-m/nngceckbapebfimnlniiiahkandclblb

2\. Click add to "your browser name" and then click add extension  
3\. click the extension icon (on the top right of your screen) and pin it   
4\. Click on the Bitwarden extension and click the gear icon  
5\. Enter your organization's Vaultwarden URL (e.x passwords.example.com) and click save.  
6\. Enter your account details and click continue

# How to disable a Vaultwarden account

1 - Go to Vaultwarden admin panel, your-instance-ur/admin/ and access using the admin token which we have shared with you.  
2 - Go to the Users tab on the top panel. Locate the user and then Deauthorize sessions and Disable account.

[![image.png](https://docs.cloud68.co/uploads/images/gallery/2026-01/scaled-1680-/5qG2Rj5qR38gX81Y-image.png)
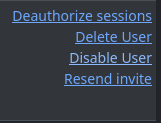
](https://docs.cloud68.co/uploads/images/gallery/2026-01/5qG2Rj5qR38gX81Y-image.png)

That's it!